Ah, where to begin with this one!
Doing this set of nails was laborious to say the least. You know when you start doing your nails and you have a fairly simple image in your head, but as you start to paint them and whatnot, you think 'hmm, that looks a bit plain, I'll add something there' and 'oh, what about doing this topcoat on it' et cetera, and before you know it, you're suffering from hand cramp and eye strain thinking 'why, WHY did I start this?' at 1 o'clock in the morning? Heh... yeah.
Well, lucky for you, I'm not going to go through all the stages of thought I had while doing this because a) I wouldn't want to bore you, and b) honestly, I can't even remember at this point... such a blur.
Anyway! I found some leftover bits of my favourite water decals, also used in this post from 3 and a half years ago (wow, time flies!) and used them initially on my ring finger but then, during my never ending 'ideas' I cut bits up and put them on my index finger and thumb too. The index finger and middle finger both have gradients from white to pink (from lightest to darkest pink, the polishes used were Barry M - Rose Hip, Nails Inc - Kensington Square, and Rimmel Pro - Show Off), and I went over them with a coat of Barry M - Crystal Glaze. I added a little pearl stud to the thumb and middle finger... for some reason. My pinky had the easiest time here, with just a coat of Nails Inc - Kensington Square (like what was used as the main colour on the thumb) and 2 coats of glittery GOSH - Girls on Film.
Well I think I covered everything while avoiding all the boring stages between one layer and another! It's obviously far more tiring when you're doing nails you actually want to go out in public with because you have to do both hands, and ambidextrous I am not! It's strange though - even though doing my nails can start feeling a bit tedious after spending hours on them, I still really enjoy it!
Bye for now!
Showing posts with label Water Decal. Show all posts
Thursday, 18 February 2016
Tuesday, 29 January 2013
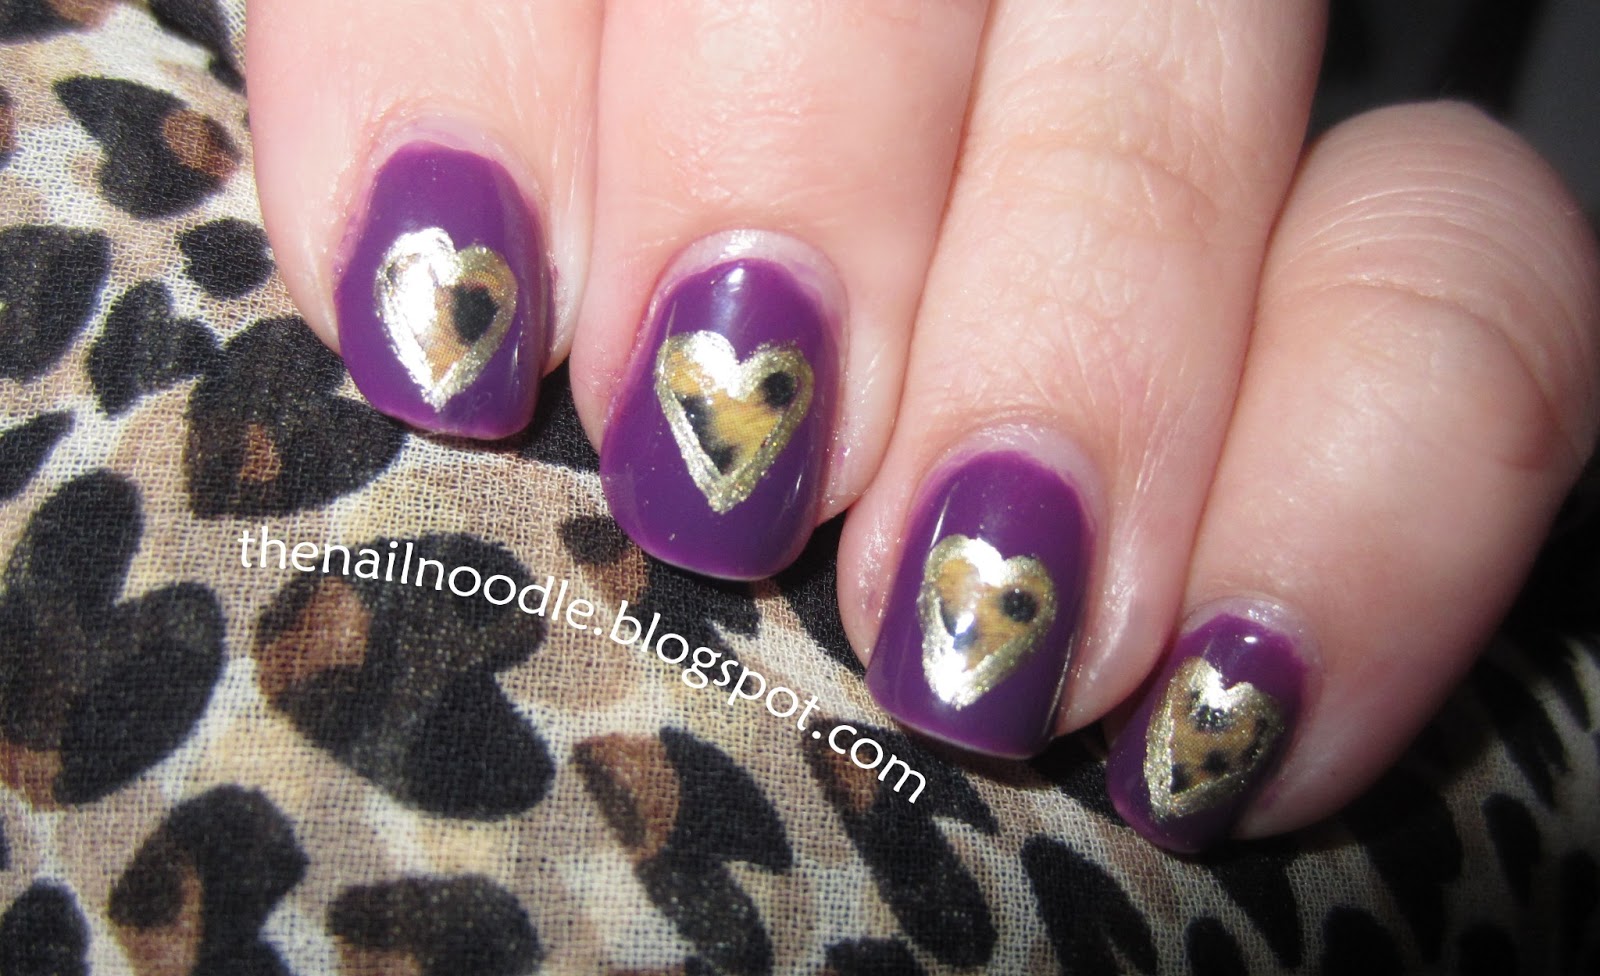
Animal Print Hearts
I fancied doing some kind of nail art which I actually liked. I've been doing some lately but not even photographing them because they look so horrible.
Today's nail art isn't amazing, but it's an improvement from my recent attempts at creativity.
I took inspiration from a top I have which has nice little hearts of animal print. I thought I would mix it with purple, because I love it so! The purple used is Essence '05 Maybe I'm Amazed' which I really don't know if it's available in the UK because I got it on holiday elsewhere in Europe. I haven't seen it here though.
For the hearts, I used one out of twelve water nail decals (the set comes in 12 so I cut one out as I didn't want to waste an entire set just on hearts). I managed to cut it into 10 little hearts, and honestly, I think this took me longer than anything else.

I then painted (badly) Barry M Gold Foil around the edged of the hearts because they didn't stand out much from the background (they look darker in real life and there wasn't much contrast).
Overall, I'm relatively happy with it, probably more because I opened another bottle of Seche Vite for this because my other one is thick and I don't know if I can be bothered to buy Restore. I'll see!
Today's nail art isn't amazing, but it's an improvement from my recent attempts at creativity.
I took inspiration from a top I have which has nice little hearts of animal print. I thought I would mix it with purple, because I love it so! The purple used is Essence '05 Maybe I'm Amazed' which I really don't know if it's available in the UK because I got it on holiday elsewhere in Europe. I haven't seen it here though.
For the hearts, I used one out of twelve water nail decals (the set comes in 12 so I cut one out as I didn't want to waste an entire set just on hearts). I managed to cut it into 10 little hearts, and honestly, I think this took me longer than anything else.

I then painted (badly) Barry M Gold Foil around the edged of the hearts because they didn't stand out much from the background (they look darker in real life and there wasn't much contrast).
Overall, I'm relatively happy with it, probably more because I opened another bottle of Seche Vite for this because my other one is thick and I don't know if I can be bothered to buy Restore. I'll see!
Labels:
Hearts,
Nail art,
Purple,
Water Decal
Friday, 25 January 2013
Och aye!
So today was Robert Burns Day in Scotland, a celebration of one of the country's most famous poets. Most people have a Burns' supper consisting of haggis, neeps (turnips) and tatties (potatoes).
I really don't like haggis... nor turnips, therefore my dinner was roast potatoes and lasagne. I really fit the stereotypical Scottish mould, don't I?
I was invited to a ceilidh tonight but I really didn't feel like it, in fact I was off today with yet another migraine. On the upside, it actually snowed enough to cover my garden today!
My nails are appropriately a lovely tartan design, and if it wasn't obvious, these are water decals (no way could I do that kind of elaborate nail work on my own!) and apologies that I took the photos a few days after I did them, so the edges are a bit worn.
Hope you had/are having a wonderful Friday wherever you are! I thought it would be appropriate to finish with a poem from Robert Burns. This is one of his most well known poems. :)
A Red, Red Rose
O my Luve's like a red, red rose
That's newly sprung in June;
O my Luve's like the melodie
That's sweetly play'd in tune.
As fair art thou, my bonnie lass,
So deep in luve am I:
And I will luve thee still, my dear,
Till a' the seas gang dry:
Till a' the seas gang dry, my dear,
And the rocks melt wi' the sun:
I will luve thee still, my dear,
While the sands o' life shall run.
And fare thee well, my only Luve
And fare thee well, a while!
And I will come again, my Luve,
Tho' it were ten thousand mile.
Robert Burns
I really don't like haggis... nor turnips, therefore my dinner was roast potatoes and lasagne. I really fit the stereotypical Scottish mould, don't I?
I was invited to a ceilidh tonight but I really didn't feel like it, in fact I was off today with yet another migraine. On the upside, it actually snowed enough to cover my garden today!
My nails are appropriately a lovely tartan design, and if it wasn't obvious, these are water decals (no way could I do that kind of elaborate nail work on my own!) and apologies that I took the photos a few days after I did them, so the edges are a bit worn.
Hope you had/are having a wonderful Friday wherever you are! I thought it would be appropriate to finish with a poem from Robert Burns. This is one of his most well known poems. :)
O my Luve's like a red, red rose
That's newly sprung in June;
O my Luve's like the melodie
That's sweetly play'd in tune.
As fair art thou, my bonnie lass,
So deep in luve am I:
And I will luve thee still, my dear,
Till a' the seas gang dry:
Till a' the seas gang dry, my dear,
And the rocks melt wi' the sun:
I will luve thee still, my dear,
While the sands o' life shall run.
And fare thee well, my only Luve
And fare thee well, a while!
And I will come again, my Luve,
Tho' it were ten thousand mile.
Robert Burns
Labels:
Tartan,
Water Decal
Sunday, 19 August 2012
Water Decals: Pink Flowers on Blue
Normally, I do my own nail art, but from time to time I enjoy doing water decals because they look awesome and I'm not exactly a Van Gogh either!
There are quite a few methods of how to apply water decals but this is what works for me:
1. Clean nails completely, push back cuticles.
2. Do a clear coat on your nails (I use Barry M All in One).
3. Cut out desired decal, it is not necessary to cut water decals exactly to size (which is why I love them).
4. Place decal in water for about 15-20 seconds or so and slide decal off the paper backing (these work similar to fake tattoos).
5. Place decal on your nail, using dry cloth to dab away water and push out any air bubbles.
6. Paint another coat of your clear polish on top. The excess decal begins to curl when in contact with polish so take a toothpick or any wooden stick to gently take this excess off.
I love these nail wraps, I've bought them a couple of times because they look lovely. My favourite!
There are quite a few methods of how to apply water decals but this is what works for me:
1. Clean nails completely, push back cuticles.
2. Do a clear coat on your nails (I use Barry M All in One).
3. Cut out desired decal, it is not necessary to cut water decals exactly to size (which is why I love them).4. Place decal in water for about 15-20 seconds or so and slide decal off the paper backing (these work similar to fake tattoos).
5. Place decal on your nail, using dry cloth to dab away water and push out any air bubbles.
6. Paint another coat of your clear polish on top. The excess decal begins to curl when in contact with polish so take a toothpick or any wooden stick to gently take this excess off.
I love these nail wraps, I've bought them a couple of times because they look lovely. My favourite!
Labels:
Water Decal
Subscribe to:
Posts (Atom)