Muahahaha-uh, I mean Hello! Today I thought I'd share my nail art for Halloween, which I only realised the other day is the first time I've done Halloween nail art since 2012 I believe?! To be fair, I usually had a lot of essays to do around this time so that's probably why.
I'm actually not that bothered about Halloween, but I do like pumpkins (well, carving them anyway) so I decided to do some purple and orange nails with pumpkins (and bats!) this year.
I'd like to say this didn't take me a long, long time to do but that would be lying. I used my silicone mat to paint the pumpkins to create 'nail polish stickers' for the thumb and ring finger. If I had been just doing one hand, I would have just painted them directly on the nails but as I was doing this on both hands and I am not ambidextrous, this was the best option! I also used this method for the black triangles and bats, using cuticle scissors to cut once dry so that I had nice sharp edges.
I think I'll stop there for now because I've got a cold and I am struggling to concentrate on anything! Bye!
Showing posts with label Purple. Show all posts
Saturday, 29 October 2016
Saturday, 1 February 2014
Nails Inc: 'My Nail Polish Diary' - February
For the main post on Nails Inc's 'My Nail Polish Diary', with links to all other months, click here.
So February is here, and we know what that means! Nails Inc's February polish, which is St. Martin's Lane! All nails have a single coat apart from the ring finger which has 2 coats to let you see its thickness and opacity.
I love how it applies and is lovely and shiny when dry. I would recommend more than one coat though, one is a bit too thin!
The colour, as described by Nails Inc, is a deep wine shade, and I think it's very fitting to the darkness of winter I'm currently experiencing!
So February is here, and we know what that means! Nails Inc's February polish, which is St. Martin's Lane! All nails have a single coat apart from the ring finger which has 2 coats to let you see its thickness and opacity.
I love how it applies and is lovely and shiny when dry. I would recommend more than one coat though, one is a bit too thin!
The colour, as described by Nails Inc, is a deep wine shade, and I think it's very fitting to the darkness of winter I'm currently experiencing!
Tuesday, 29 January 2013
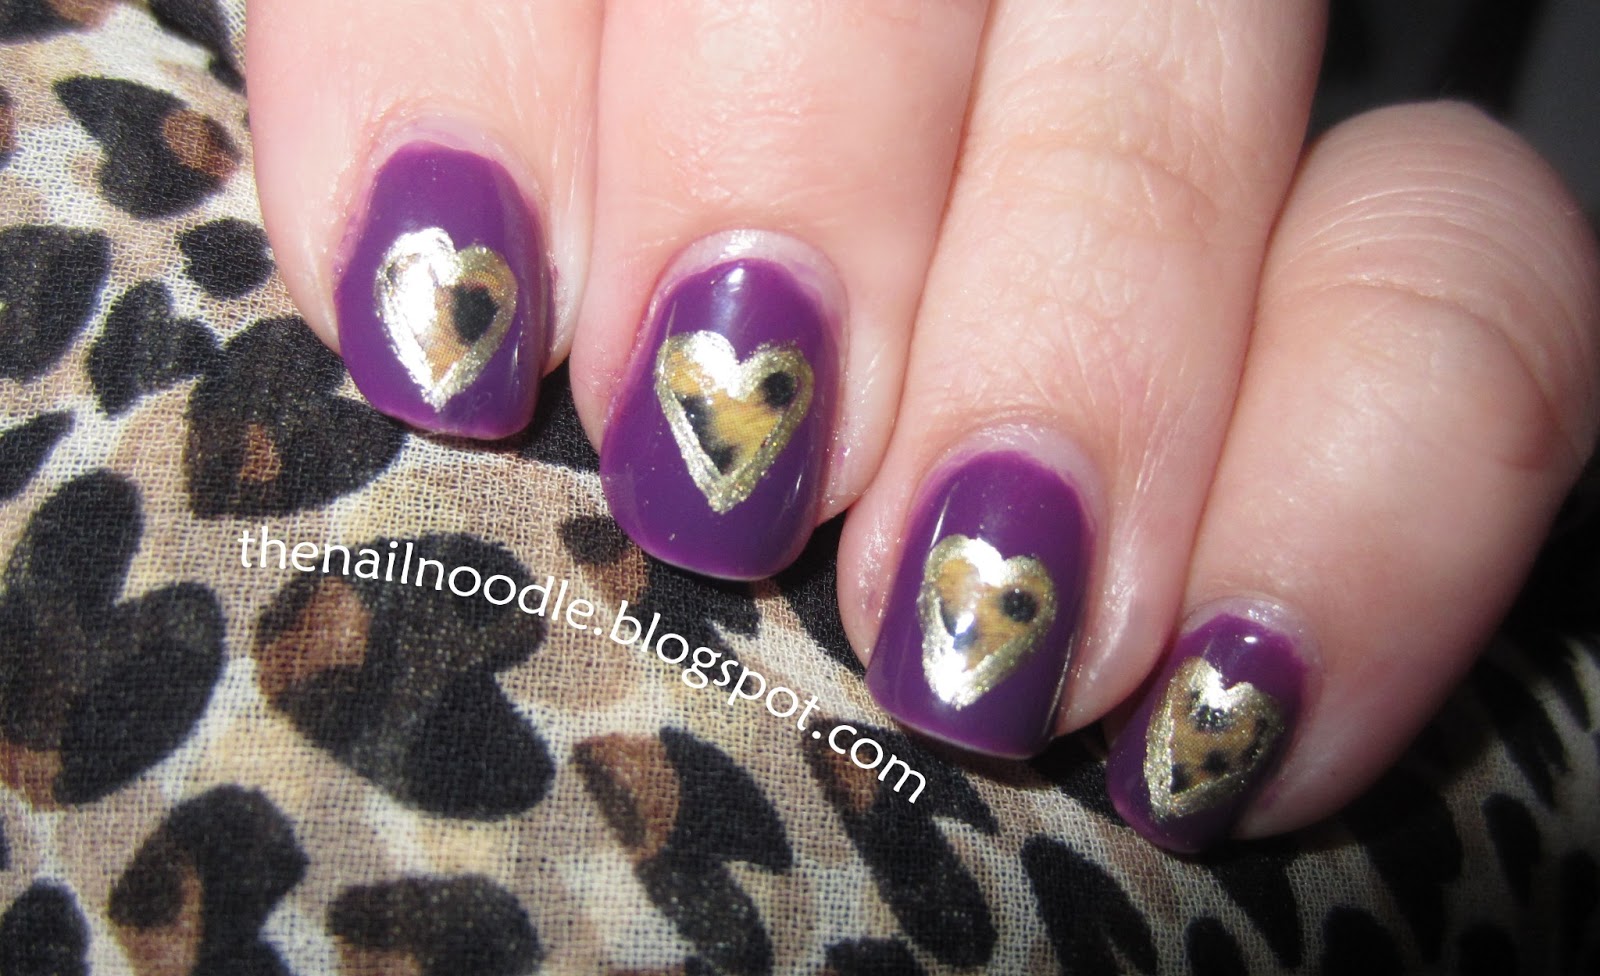
Animal Print Hearts
I fancied doing some kind of nail art which I actually liked. I've been doing some lately but not even photographing them because they look so horrible.
Today's nail art isn't amazing, but it's an improvement from my recent attempts at creativity.
I took inspiration from a top I have which has nice little hearts of animal print. I thought I would mix it with purple, because I love it so! The purple used is Essence '05 Maybe I'm Amazed' which I really don't know if it's available in the UK because I got it on holiday elsewhere in Europe. I haven't seen it here though.
For the hearts, I used one out of twelve water nail decals (the set comes in 12 so I cut one out as I didn't want to waste an entire set just on hearts). I managed to cut it into 10 little hearts, and honestly, I think this took me longer than anything else.

I then painted (badly) Barry M Gold Foil around the edged of the hearts because they didn't stand out much from the background (they look darker in real life and there wasn't much contrast).
Overall, I'm relatively happy with it, probably more because I opened another bottle of Seche Vite for this because my other one is thick and I don't know if I can be bothered to buy Restore. I'll see!
Today's nail art isn't amazing, but it's an improvement from my recent attempts at creativity.
I took inspiration from a top I have which has nice little hearts of animal print. I thought I would mix it with purple, because I love it so! The purple used is Essence '05 Maybe I'm Amazed' which I really don't know if it's available in the UK because I got it on holiday elsewhere in Europe. I haven't seen it here though.
For the hearts, I used one out of twelve water nail decals (the set comes in 12 so I cut one out as I didn't want to waste an entire set just on hearts). I managed to cut it into 10 little hearts, and honestly, I think this took me longer than anything else.

I then painted (badly) Barry M Gold Foil around the edged of the hearts because they didn't stand out much from the background (they look darker in real life and there wasn't much contrast).
Overall, I'm relatively happy with it, probably more because I opened another bottle of Seche Vite for this because my other one is thick and I don't know if I can be bothered to buy Restore. I'll see!
Labels:
Hearts,
Nail art,
Purple,
Water Decal
Tuesday, 25 September 2012
Bourjois 1 Seconde Rainbow Apparition Nail Polish
![]() |
| Indoor with flash |
![]() |
| Natural light - no flash |
The glitter is, in my opinion, really pretty and in the right lighting the glitter has a multicoloured, holographic kind of effect (but it is not a holographic nail polish). The pictures really don't do it justice, and I tried shining a lot of lights on it to give a good idea of how it really looks. In regular lighting, the glitter does just look silver but it's the way that the light hits it that makes it have a nice effect.
Also, I'd like to add that I put Seche Vite on top because the polish doesn't dry smooth due to the glitter and the top coat just helps the glitter to sparkle more.
Tuesday, 4 September 2012
Lilac Galaxy Half Moon Art
Something I done last week but had no time to put up. I went down to Ryman and got myself ring reinforcements and decided to give them a try. I don't think it came out too bad! Definitely can't wait to try different colours with this as the 2 I have aren't the most contrasting on the planet.
The colours are just ones I talked about last week - GOSH Wild Lilac as the base with 1 coat of GOSH Galaxy on each.
It's such an easy thing to do and looks awesome - I would recommend taking the stickers off before it dries - like what I did, because sometimes it mucks up for people if you leave the stickers on too long.
I finished with a Barry M topcoat to seal in the colour and level out the nails. :)
The colours are just ones I talked about last week - GOSH Wild Lilac as the base with 1 coat of GOSH Galaxy on each.
It's such an easy thing to do and looks awesome - I would recommend taking the stickers off before it dries - like what I did, because sometimes it mucks up for people if you leave the stickers on too long.I finished with a Barry M topcoat to seal in the colour and level out the nails. :)
Thursday, 30 August 2012
GOSH Wild Lilac Nail Polish
![]() |
| Indoor - with flash |
I absolutely love pretty much any shade of purple and this ticks all the boxes for me.
![]() |
| Indoor - no flash |
I felt it was actually good with just one coat but I did 2 anyway. I added a photo of it indoors with no flash (2nd picture) so that you can see the slight colour difference between the bottle and the polish on the nail. Although not very visible with flash, I think in real life it does look slightly darker on the nail than in the bottle so I tried to illustrate this.
Overall I really like this colour, along with its texture and longevity. :)
Tuesday, 21 August 2012
Nail Stamping - First Effort
So yesterday I got my Bundle Monster plates and my Konad stamper & scraper. YAY!
I'm posting this today because after trying the system out, I got a massive headache and just couldn't be bothered to stay on the computer much!
I mucked about with it for a while, trying to figure out which polishes I could use - turns out, not many! I first tried out some of my No7 collection but even though they are 'pigment rich', they didn't show up at all. I then tried out Barry M, which generally worked better. The best ones were the silver and gold nail effects.
I have ordered Sally Hansen Xtreme Wear White On & Black Out, so hopefully they'll work better than my black and white!

This is my best effort from yesterday and it is pretty messy but I really wasn't bothered much about it because I was just trying out techniques.
This is what I used:
Base colour: Barry M Vivid Purple
Stamping colour: Barry M Instant Nail Effects Silver Foil
Stamping plate: BM-208 for both stampers.
The ring finger is done from the same plate as the others but is the inverted one.
It very much resembles crackle nail polish, but it's a lot neater and obviously isn't bumpy. I'm looking forward to trying out some of the other designs I have, and seeing if there are any other polishes i have that also work.
I'm posting this today because after trying the system out, I got a massive headache and just couldn't be bothered to stay on the computer much!
I mucked about with it for a while, trying to figure out which polishes I could use - turns out, not many! I first tried out some of my No7 collection but even though they are 'pigment rich', they didn't show up at all. I then tried out Barry M, which generally worked better. The best ones were the silver and gold nail effects.
I have ordered Sally Hansen Xtreme Wear White On & Black Out, so hopefully they'll work better than my black and white!

This is my best effort from yesterday and it is pretty messy but I really wasn't bothered much about it because I was just trying out techniques.
This is what I used:
Base colour: Barry M Vivid Purple
Stamping colour: Barry M Instant Nail Effects Silver Foil
Stamping plate: BM-208 for both stampers.
The ring finger is done from the same plate as the others but is the inverted one.
It very much resembles crackle nail polish, but it's a lot neater and obviously isn't bumpy. I'm looking forward to trying out some of the other designs I have, and seeing if there are any other polishes i have that also work.
Subscribe to:
Posts (Atom)