Ads 468x60px

Showing posts with label Glitter. Show all posts

Thursday, 18 February 2016

Rosy Pink Nails

Ah, where to begin with this one!

Doing this set of nails was laborious to say the least. You know when you start doing your nails and you have a fairly simple image in your head, but as you start to paint them and whatnot, you think 'hmm, that looks a bit plain, I'll add something there' and 'oh, what about doing this topcoat on it' et cetera, and before you know it, you're suffering from hand cramp and eye strain thinking 'why, WHY did I start this?' at 1 o'clock in the morning? Heh... yeah.

Well, lucky for you, I'm not going to go through all the stages of thought I had while doing this because a) I wouldn't want to bore you, and b) honestly, I can't even remember at this point... such a blur.

Anyway! I found some leftover bits of my favourite water decals, also used in this post from 3 and a half years ago (wow, time flies!) and used them initially on my ring finger but then, during my never ending 'ideas' I cut bits up and put them on my index finger and thumb too. The index finger and middle finger both have gradients from white to pink (from lightest to darkest pink, the polishes used were Barry M - Rose Hip, Nails Inc - Kensington Square, and Rimmel Pro - Show Off), and I went over them with a coat of Barry M - Crystal Glaze. I added a little pearl stud to the thumb and middle finger... for some reason. My pinky had the easiest time here, with just a coat of Nails Inc - Kensington Square (like what was used as the main colour on the thumb) and 2 coats of glittery GOSH - Girls on Film.

Well I think I covered everything while avoiding all the boring stages between one layer and another! It's obviously far more tiring when you're doing nails you actually want to go out in public with because you have to do both hands, and ambidextrous I am not! It's strange though - even though doing my nails can start feeling a bit tedious after spending hours on them, I still really enjoy it!

Bye for now!

Monday, 15 February 2016

White and Purple Glitter Look

Hi! Another short post from me today! This is actually a more recent photo this time.

I know it's fairly simple but thought I'd share it as it's a style I don't normally do, and by that I mean painting my index and pinky the same and the rest being a different colour. Recently, I bought the glitter (No7 Nail Effects 'Party Pearls') which I liked because it has a mix of purple, blue and pink so I painted all my nails white, painted the glitter on the index and pinky (in hindsight, I wish I had made it more concentrated) and then used purple and blue gems to match the glitter colours, but used Rimmel Glitter Bomb 'Disco Fever' on the middle finger (I like that the glitter in this are square shaped). I think I only did one coat of this.

Oh, just remembered! The other reason I wanted to do some glittery nails was to test out a peelable base coat - OPI's Glitter Off - which, like most other peelable base coats, is much like PVA glue in both smell and consistency, only I find that the OPI stuff dries quicker. I cannot believe I haven't looked into peelable base coats sooner, really. Amazing! I've avoided doing a lot of glitter lately because I HATE the removal process but with this, it's so much easier! I must add that I bought the OPI base coat for £3.99 in TK Maxx which I think is great but I doubt I'd pay the RRP for it - PVA glue will probably be my replacement, who knows! I'm already using PVA glue in an old nail polish bottle and applying it around my nail before doing gradients, works great (I'm keeping the OPI stuff just for the nails!).

Sorry for the bad quality photo - I decided to take this on a day that offered no natural light whatsoever.

In a bit of a rush so bye for now!

Monday, 1 December 2014

Nails Inc: 'My Nail Polish Diary' - December

For the main post on Nails Inc's 'My Nail Polish Diary', with links to all other months, click here.

 Wow! The final Nails Inc diary post! I actually kept to the plan I made myself last December and have posted on the first of every month all year! Quite proud of that, really!
There have been many times I've almost forgotten to post, frantically writing it the night before... which is totally not what I am doing right now or anything! *cough*

I wish I could write a nice long post but I've just finished writing an essay so this isn't really the time to write another one!

So, to the polish! This month is Knightsbridge Road, which is kind of translucent in certain lights. On the ring finger, I painted 2 coats of the polish over last month's foil and 1 coat over the foil on the pinky in order to show the gold, blue and red glitters.

I totally get why this colour was chosen for December, it's just so festive! Looking forward to wearing this later in the month!

Well, it's been great! I hope to squeeze in another post or two before the new year!

x

Wednesday, 1 October 2014

Nails Inc: 'My Nail Polish Diary' - October

For the main post on Nails Inc's 'My Nail Polish Diary', with links to all other months, click here.

 Well, hello! Ahhhh, it's October already! I can already smell the cinnamon scented candles (I love candles, even if I am essentially burning my money as I've been told a number of times!).

However, this post is all about this month's Nails Inc polish which is Belgravia Place and is part of the Fibre Optic collection.

So, here I have painted 2 coats of this lovely polish on each nail, apart from the ring finger, on which I only painted one coat onto a layer of next month's polish (South Kensington) so that you can see what it looks like over something else.

I quite like this, but I'd probably use it more towards Christmas. The colours are quite difficult to capture on a camera which is why even though the second picture is a tad blurry, I'm still using it because out of 10 photos, it showed off the glitter the best.

Like most polishes with this kind of glitter, they can be a bit annoying to paint as they just go EVERYWHERE, but I do think it can look quite nice!

Thursday, 1 May 2014

Nails Inc: 'My Nail Polish Diary' - May

For the main post on Nails Inc's 'My Nail Polish Diary', with links to all other months, click here.

It's May Day, which means it's time for Nails Inc's polish of the month - Fulham Palace Gardens! It is a pink coloured polish with multi-coloured glitter, as you can see!

It looks very close to Barry M Pink Sequin Nail Effects which has the same colours but is textured, while Nails Inc is not. Therefore, I painted the thumb and index finger with Barry M to contrast it. I'm not the world's biggest fan of either really - I kind of think it's a bit much and just looks a bit random but that's just my thought on it.

Sorry for the short post, but I hope to write more in the Summer! :)


Monday, 6 January 2014

'V-shape' Nail Art

Sometimes it's nice to do a simple design rather than elaborate scribbles which make my eyes hurt -- although I did end up having to spend more than I had planned on this.

The reason being that this is textured nail polish which can be a little bit tricky to draw with. The base colour is done with two coats of Rimmel Space Dust 'Aurora' while the V-shape is done with Rimmel Space Dust 'Total Eclipse'.

I had the bright idea of using my usual masking tape for this design - cutting a 'V' shape into a square of masking tape and placing the two pieces a few millimetres away from each other on the nail, using the gap as a stencil for the 'V'. I realize while I am writing this that that I should have just taken a picture when I was making this but I didn't, so I really can't explain it any better unfortunately!
The problem is that obviously masking tape doesn't really stick to textured nail polish (however this concept didn't occur to me at the time - it's a bit like sticking tape to a cement wall and being surprised when it falls off instantly) so I had to paint the V in about 1.5 seconds which was a complete mess and I ended up just painting them with a nail art brush (still, the tape template provided some guideline, I guess!).
Therefore, as mentioned, I ended up taking longer than I thought, but hey-ho, you live and you learn!

Tuesday, 31 December 2013

Last post of 2013!

Just like last year, the 'New Year Nails' post, which can be found here, it's just a very random design. I mean, I very literally just opened up polishes and tapes, making it up as I went along (which, trust me, I rarely do).

I mainly just wanted to do another post before the bells chime, and wish you all a lovely and happy new year! I will be watching the TV as usual, singing Auld Lang Syne and watching some fireworks, haha. No 'New Years Resolutions' for me this year, however I am hoping at least do a post every month (I hate not doing any posts for months on end!).
By the way, the pink used is Rimmel Cocktail Colour '140 Hawaiian Punch', with Barry M glitters 'Amethyst', 'Christmas Glitter 2012', 'Ruby Glitter' and limited edition 'Tinsel Town'... yeah, told you it was random!

I will have a new post tomorrow! :)

HAPPY NEW YEAR!

Tuesday, 24 December 2013

Merry Christmas!

I cannot believe I've not had the time to post here since August, that's shocking! I had planned to do a post for Halloween at least, but I didn't have the time - too much uni work.

However, I am free for the holidays and wanted to wish everyone a very Merry Christmas and a Happy New Year!

Hope you enjoy these nails, they're nothing special (Christmas String Light nails have been done many times), but I had to do something before the end of the year! Must try to regain my creativity.

The base gold is Maybelline Color Show Brocades 'Knitted Gold' which my friend bought me. I love it, it kind of looks like foil from afar. It's a little bit translucent so even with 2 coats (like in the picture), it looks really gold when the light hits it, but in some lights you can just see the glitter and your nail. Overall it's really nice!

Sorry for the abrupt post, I'm in a bit of a rush.

Have a great holiday!

Sunday, 14 July 2013

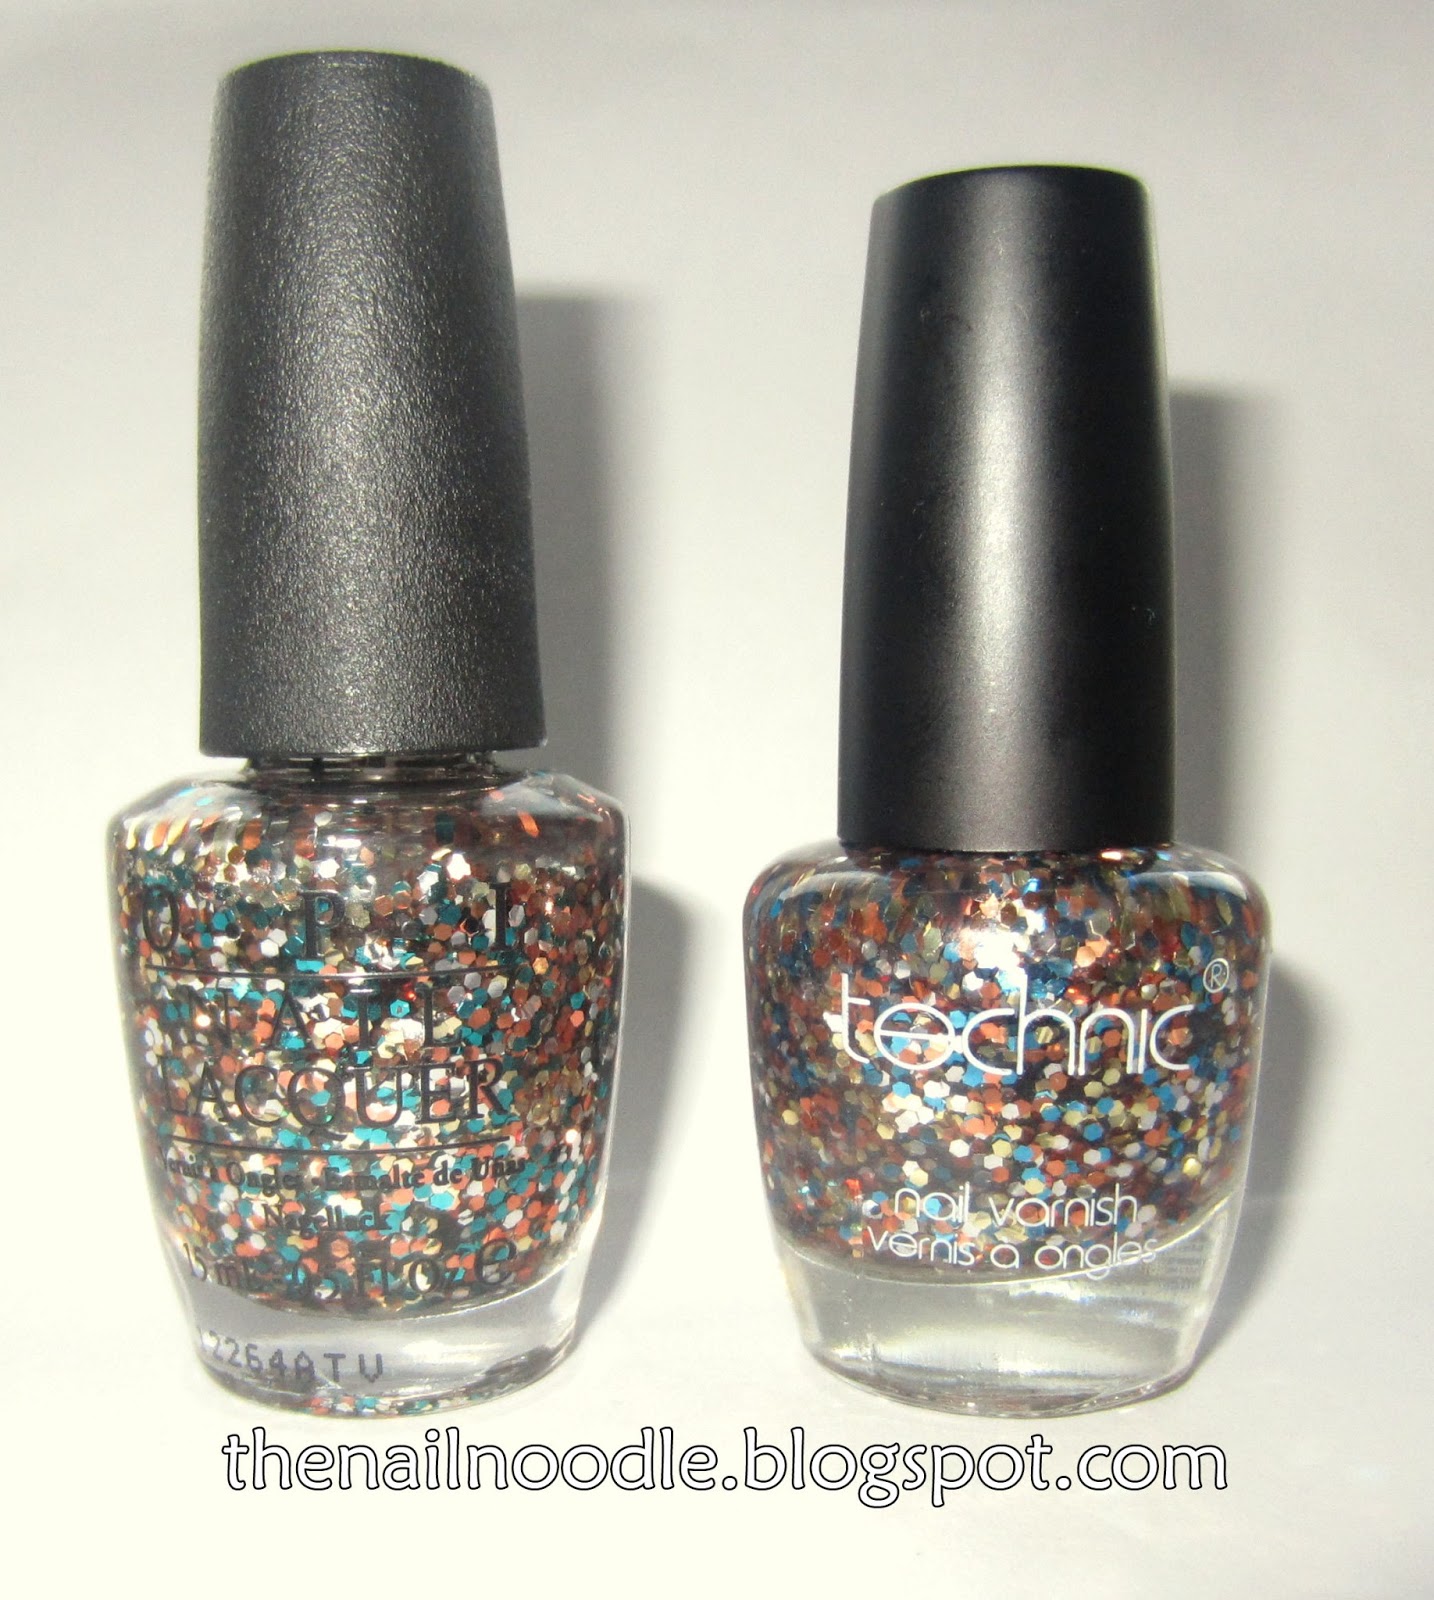
OPI 'The Living Daylights' Dupe!

Quite a while back (I think last year actually), I purchased OPI 'The Living Daylights' online. I don't usually buy polishes that are that expensive (this one costs on average £9).

It wasn't until last week when I was in Bodycare, I decided to have a look at the nail polishes and one in particular caught my eye. They mainly sell Technic polishes, and one called 'Money Bags' struck me as being identical to the aforementioned OPI polish. It only costs 99p, so naturally I felt compelled to buy it to see how similar they are...


I think the resemblance is very clear indeed! As indicated in the pictures, I used OPI on the index and ring finger, while using Technic on the middle finger and pinky.

I put about 3 coats on each nail so that I had enough glitter on the nail to show the two polishes well. The application between the two is very similar - if anything, perhaps the OPI polish has slightly more glitter in it than the Technic one.

The glitter sizes are the same in both polishes, and they have same same shade of gold, silver and bronze in my eyes. The only difference is that the OPI has a slightly more turquoise-y blue than Technic. You can see the difference closer by clicking on the pictures. Also, sorry that the Technic polish looks a bit 'bubbly'. I think it's more my fault than a fault of the polish. I got a bit impatient and the OPI dried faster than the Technic between coats so I was painting the Technic while it was still tacky underneath. At least that shows that OPI dries a lot faster because I didn't have to wait much between coats!

Monday, 31 December 2012

New Year Nails!

Well, I hope you all had an amazing year! I personally don't care much for New Year - I stay up to watch the countdown on TV and then go to bed, haha. I did decide, however, to do some kind of nail polish with the inspiration of fireworks and lasers in the night...
Before I get into that, I hope you like the new design to the blog... it took me absolutely ages because certain things just wouldn't co-operate to begin with, and after about 3 hours, html becomes extremely irritating.
 Anyway! To the nails! I have 2 designs today, fairly similar really. The main reason is that the first one chipped within 24hrs of doing it, so I had to do something else. This is the first one! I used Barry M Navy and then used some Barry M Jewel Glitter Amethyst at the tips, blending it a bit with the brush so that it was kind of a gradient.
My Seche Vite topcoat didn't hold it though, which was a first. For me, anything that is sparkly on dark polish looks like sparklers or fireworks so BOOM! Glitter on dark blue it is!
 As I said though, the polish chipped fairly quickly so I decided to use some of my new tapes (which I learned- the hard way - loses it's colour if you apply it onto damp nail polish so must applied to completely dry polish). I have such tape on the index and ring finger. The thumb and ring finger have OPI Casino Royale as the base, and the others have the above mentioned Barry M Navy.


 The thumb has the same glitter (Barry M Jewel Glitter Amethyst) as above, covering the nail completely and only the tip of the pinky nail.
The middle finger has Models Own Mirrorball Freak Out! - I found that it matched really well with the tapes I was using.


I took quite a few pics, too many really! I found it difficult to choose because some are better for different reasons.

Anyway, this is lasting a lot longer, I've had it on for about 3 days now!


I hope you have a marvelous new year!

Sunday, 23 December 2012

Christmas Nail Art!

So, I got the chance to do some Christmas nail art last week and managed to keep it on for about 4 days with Seche Vite. As you see, from thumb to pinky, I painted on a snowman, Santa, Rudolf, a Christmas tree and left the fifth with snow.

The background has some China Glaze Techno and some white dots painted on. For the Christmas tree, I used 2 greens I have, with the sparkle from the limited edition Barry M Christmas polish. I've used some jewels, such as those on the tree, Rudolf's nose and the end of Santa's hat. :) I used a lot of polishes on this, so if there is any you would like to know, drop me a comment. It took me about 2 hours to do this haha, very intricate work!
 Hope you have a very Merry Christmas! :)

Sunday, 2 December 2012

Barry M Ruby Glitter

Hey all! Well it has taken me over a month to post this, I've had so much work to do. I'm on 'revision week' for my upcoming exams so naturally I'm taking this chance to post some actual nail polish stuff.
My posts may not be as long as I would have liked, but I have so much to get through, and honestly, there isn't a lot to say about some of the polishes so I'm not going to go on for a paragraph about how shiny something is.
Before I start, I'm gonna say... I 'ombre/dip-dyed' my hair yesterday - it was a magical experience(!) Actually, I did it yesterday afternoon, and with it being winter the sun was down so in artificial light it looked fine but this morning I was like 'oopsies!' so I dyed over it with a lightish brown I had bought just in case of such a catastrophe... I'd like to think it doesn't look quite as frightening as it did this morning (at least it no longer looks like my hair is on fire). I'm not a massive fan of dying my hair every day or anything, so I'm at that point that I don't even care at the minute -- I'll maybe dye it again with more brown some other time and let my hair heal from the bleach... :P
Well anyway, now to move on to some actual nail polish. Here's some Barry M Ruby Glitter. Basically, it's a black and pink glitter, with teeny tiny specks of black throughout. The base is clear, and in these pictures, I painted it over No7 Thunderstorm. I want to try it over something lighter some other time as the contrast isn't that great on grey, but you get the gist. I hope.
Anyway, I like it.

BYE.

Friday, 12 October 2012

Barry M Gelly Hi-Shine Pomegranate Nail Polish


The first thing I'm going to say is 'Boooo' my nails are shorter! I broke 2 of them on my right hand while closing the boot of a car (and no, I didn't close them in it, I went to pull it down and my hand slipped so bye-bye nails! I decided to cut all of them the same while I was at it. It doesn't actually bother me to be honest because it's a bit easier to type, especially on a tablet which is what I'm writing on right now. I'm so dedicated to this blog I'm writing this on a 8.40am train *yawn*.

So to the actual polish... thumbs up, my friends! The pictures don't have any topcoat or anything. I painted the ring finger nail with Barry M Gold Foil and put 2 coats of Technic 'Carnival' that I bought in the weekend, I love this glitter! Partly because the glitter doesn't cause the nail to feel rough and the clear polish itself is really good at making the nail shine.
The Pomegranate shade is a really lovely and certainly quite a fun colour to use!


Tuesday, 2 October 2012

Avon Lemon Sugar Nail Polish (and some nail art thrown in)

Indoors - flash
Today's post is a little more picture based than usual, reason being that I was swatching this polish for the blog and then decided to just keep it on and so some half moon art with it.

So this is Lemon Sugar by Avon, and because I order through a local representative, it takes 3 weeks to get delivered - but delivery is free so I can't complain!

Indoors - no flash
The first thing I will say is that it's a fairly nice colour. I'm not much of a fan of yellow, but it is a nice lighter shade and not in-your-face neon. One coat was actually not too bad but you do get areas where your own nail which is obviously darker than this) comes through, so I did 2 coats.

I felt that this would go with pastel colours so I decided to do the half moon mani on it. The colours used (from thumb to pinky) are: Barry M Mint Green, MUA Shade 16, Barry M Blue Moon, No7 Lucky Lilac, Barry M Boots Limited Edition. Basically the same colours I used for the pastel zebra nails I did about a month ago. I put a glitter topcoat (17 Nail Xtras Glitter) and then Seche Vite.


I have to be honest, I didn't particularly like the nail art after I did it, but I ended up keeping it on for a few days because I was too busy with uni to change it. I think the yellow would work well in some sort of art, but I didn't particularly like it in this way because it stuck out like a sore thumb, no pun intended.

Tuesday, 25 September 2012

Bourjois 1 Seconde Rainbow Apparition Nail Polish


Indoor with flash
Today, I'm going to show you what is now probably one of my favourite nail polishes. I bought this a couple of weeks ago, mainly because there was an offer where you buy one and get the 2nd half price (and I'll do a post on the other one soon!).

Natural light - no flash
The first thing you might notice is that the bottle and top shape are unusual, and I think it looks pretty awesome in itself, haha! This 1 seconde polish has, as the bottle states, a 'gel silicone texture'. The purple gel is so sheer that one coat isn't enough unless you want a slight shimmer as a top to another colour. In the images, had to put 5 coats for it to be really strong, and for the glitter to be really concentrated so that the nail isn't visible anymore. It did use up quite a bit of the bottle though, so perhaps putting it over a purple or similar shade would be more economic. 

The glitter is, in my opinion, really pretty and in the right lighting the glitter has a multicoloured, holographic kind of effect (but it is not a holographic nail polish). The pictures really don't do it justice, and I tried shining a lot of lights on it to give a good idea of how it really looks. In regular lighting, the glitter does just look silver but it's the way that the light hits it that makes it have a nice effect.

Also, I'd like to add that I put Seche Vite on top because the polish doesn't dry smooth due to the glitter and the top coat just helps the glitter to sparkle more.